

Healthy Meal / unsweetened Fire Cider
Fire Cider in the Kitchen: Chickpeas with Fire Cider & Cilantro Dressing

- 4 oz. cilantro (I didn't measure, I just used the whole big bunch, more is more!)
- 2 Tablespoons fresh lime juice
- 2 Tablespoons Fire Cider, any variety- Unsweetened, African Bronze or Original are all delicious!
- 1/4 cup olive oil
- 1 to 2 cloves garlic
- 2 teaspoons mustard
- 1/4 teaspoon salt or more to taste
- freshly cracked black pepper to taste
Blend all the above ingredients in a food processor or using an immersion blender. Taste and adjust to your liking, add more of any of the above ingredients. The dressing is now done, use it on anything you like! But definitely try it on chickpeas:

Mix a 15 oz can of chickpeas, rinsed and drained well, with 1/3 cup diced red onion, then add in a healthy dose of dressing to cover everything really, extra well.
Then toss with greens and sprouts. Save leftover dressing and chickpeas for the next day. They'll be even more flavorful!
Recipe inspired by www.alexandracooks.com 'Chickpeas with Cilanrto-Lime Dressing'
Winter Veggie Favorites: Spaghetti Squash
The emphasis is on the spaghetti, not the squash! I was delighted the first time I made spaghetti squash, which, as the name suggests, is a lot like spaghetti inside. When compared to pasta, this squash has a lot more going! Here's the side by side comparison-
1 cup cooked pasta (made from white flour) has:
220 calories / 42 grams carbohydrates / very few nutrients
1 cup cooked spaghetti squash made by Mother Nature has:
42 calories / 10 grams carbohydrates / a good source of Niacin, Vitamin B6, Pantothenic Acid, Potassium and Manganese, and a good source of Dietary Fiber and Vitamin C.
I'll take nutrient dense, low carbohydrate plant food over-processed carbohydrates any day. Once you try this recipe, I think you'll agree!
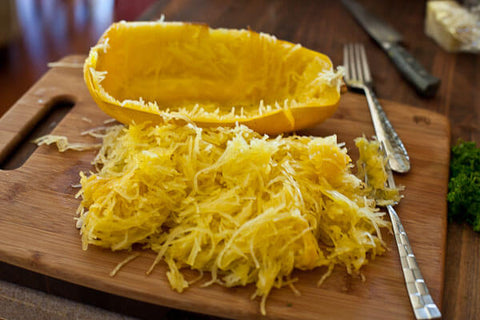
photo courtesy of steamykitchen.com
How to Bake Spaghetti Squash
- Spaghetti squash are readily available this time of year, and easy to grow yourself, if you are planning your summer garden.
- Cut squash in half, lengthwise, from stem to end. Scoop out the seeds. Lightly oil the inside and then place, skin side up/cut side down, on a baking sheet.
- Bake at 350 for 25 minutes for a smaller squash, and up to 45 minutes for a big one.
- You want to make sure to cook thoroughly, and no more! Over baked spaghetti squash gets mushy, so check it towards the end by pressing the skin, when it's done it will give a little under the pressure.
- Remove from the oven, flip it over, and let it cool a bit. I use a clean kitchen towel to hold the squash in one hand and a fork to remove all the spaghetti like strands.
- Top with your favorite marinara, puttanesca or pesto sauce, or try Lottie's recipe below, which you can make ahead.
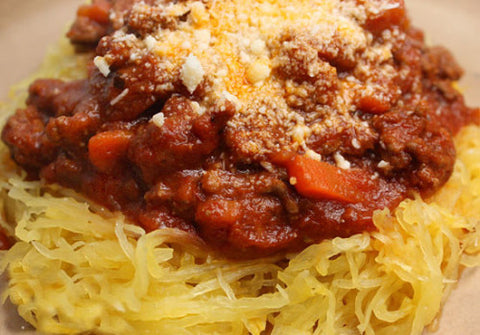
photo courtesy of runonveg.com
Slow Roasted Tomato Sauce
By Health Coach Lottie at RunOnVeg.com
Preheat oven 300/325 (depending on how hot your oven is)
-
2 cups cherry tomatoes
-
2 Rome tomatoes cut in half
-
2 medium size onions largely chopped (1 cup cooked)
-
6 garlic cloves
-
1/2 cup basil
-
1/2 cup water
-
1/4 cup Unsweetened Fire Cider or apple cider vinegar
-
salt to taste
Optional add in:
-
1/4 cup nutritional yeast
-
1-2 tablespoons hot sauce
-
2-3 dates
-
Line a baking sheet with parchment paper and non-stick spray. Place your tomatoes, onion and garlic on the baking sheet
-
Cook for 45-50 minutes until garlic is golden brown, remove the garlic from the tray
-
Cook the remaining ingredients (tomatoes and onion) for an additional 1 hour, for a total of 1 hour and 45-50 minutes
-
Once everything is cooled place all your ingredients in a blender including optional add ins and blend until smooth and creamy. Enjoy!
Quinoa Pizza Crust
Our friend Lottie came up with this gluten free quinoa based pizza crust. The recipe is from her blog, Running On Veggies, where she shares her love of healthy eating through recipes and health coaching, check her out!
"I’ve never been much of pizza eater, but I do love a crispy crunchy texture you get from the crust of a pizza. In the past, I always would take a brown rice wrap and toast it until it was crispy. This pizza crust reminds me exactly of that! But this is so much better and so easy to make! Lately I found that I don’t make or even attempt most recipes because it always seems complicated and has way too many ingredients (Still upset about all those times I attempted cauliflower crust pizza, but failed!). So I pride myself for my recipes with minimal ingredients and easy directions.

For this crust, all you really need is quinoa and water! Everything else in here just gives it more flavor. Just remember to leave yourself enough time to soak your quinoa for at least 6 hours. I soaked mine the night before, but you can totally do it before heading out for the day. And for an additional reason to try this recipe, it takes under 30 minutes to put together!
I used Unsweetened Fire Cider that added extra flavor to the pizza crust! I am so excited to play around with this product; the smell alone is incredible. The original is sweetened with honey, so naturally I was excited to see them come out with an unsweetened version. It’s really mild in taste, not like traditional apple cider vinager because it’s mixed with other flavors such as: Oranges,Lemons,Onions,Horseradish,Ginger,Habanero Pepper,Garlic and Turmeric. Along with a ton of health benefits, it tastes great on its own. To my surprise traditional pizza dough has a ton of sugar, so instead I used Fire Cider and it gave it that sweet flavor found in pizza dough!
Take a look at whats in regular store bought pizza-
Traditional Pizza Crust Ingredients:Enriched bleached wheat flour (bleached flour, malted barley flour, niacin, ferrous sulfate, thiamin mononitrate, riboflavin, folic acid), water, yeast, salt, sugar, soybean &/or cottonseed oil, whey, may contain 2% or less of enzymes &/or datem, vital wheat gluten, potassium sorbate (preservative), ascorbic acid, sodium stearoyl lactylate.
HA what are half of those ingredients?! Try this instead:
Recipe: Preheat 425 degrees
- 1 cup of quinoa uncooked (soaked for at least 6 hours or overnight)
- 1/4 cup water
- 1/2 teaspoon baking powder
- 3 tablespoons of Unsweetened Fire Cider
- 1/2 teaspoon salt
- 1 teaspoon nutritional yeast(optional for extra “cheesy” flavor”)
- 2 cloves roasted garlic (optional)
Directions:
- Rinse your soaked quinoa with a strainer really well.

- Place all your ingredients in a blender, blend for a couple minutes till really smooth and creamy. It should look like this:

- Place parchment paper on a 10-12 inch pizza pan or baking dish, Spray with non-stick spray, and spread out batter on to the dish.

- Cook for 15 minutes, then flip and cook an additional 10-12 minutes till crispy and brown.

- Place your favorite toppings on top get creative! Place back in the oven for an additional 3-5 minutes or until desired.


