

Healthy Meal
Fire Cider in the Kitchen: Chickpeas with Fire Cider & Cilantro Dressing

- 4 oz. cilantro (I didn't measure, I just used the whole big bunch, more is more!)
- 2 Tablespoons fresh lime juice
- 2 Tablespoons Fire Cider, any variety- Unsweetened, African Bronze or Original are all delicious!
- 1/4 cup olive oil
- 1 to 2 cloves garlic
- 2 teaspoons mustard
- 1/4 teaspoon salt or more to taste
- freshly cracked black pepper to taste
Blend all the above ingredients in a food processor or using an immersion blender. Taste and adjust to your liking, add more of any of the above ingredients. The dressing is now done, use it on anything you like! But definitely try it on chickpeas:

Mix a 15 oz can of chickpeas, rinsed and drained well, with 1/3 cup diced red onion, then add in a healthy dose of dressing to cover everything really, extra well.
Then toss with greens and sprouts. Save leftover dressing and chickpeas for the next day. They'll be even more flavorful!
Recipe inspired by www.alexandracooks.com 'Chickpeas with Cilanrto-Lime Dressing'
Winter Veggie Favorites: Spaghetti Squash
The emphasis is on the spaghetti, not the squash! I was delighted the first time I made spaghetti squash, which, as the name suggests, is a lot like spaghetti inside. When compared to pasta, this squash has a lot more going! Here's the side by side comparison-
1 cup cooked pasta (made from white flour) has:
220 calories / 42 grams carbohydrates / very few nutrients
1 cup cooked spaghetti squash made by Mother Nature has:
42 calories / 10 grams carbohydrates / a good source of Niacin, Vitamin B6, Pantothenic Acid, Potassium and Manganese, and a good source of Dietary Fiber and Vitamin C.
I'll take nutrient dense, low carbohydrate plant food over-processed carbohydrates any day. Once you try this recipe, I think you'll agree!
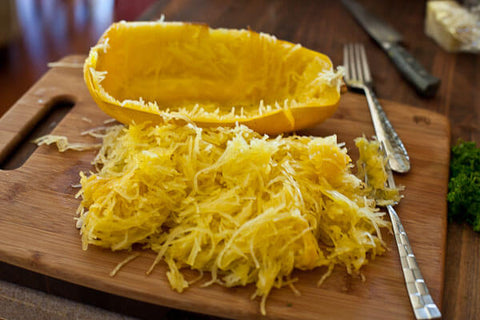
photo courtesy of steamykitchen.com
How to Bake Spaghetti Squash
- Spaghetti squash are readily available this time of year, and easy to grow yourself, if you are planning your summer garden.
- Cut squash in half, lengthwise, from stem to end. Scoop out the seeds. Lightly oil the inside and then place, skin side up/cut side down, on a baking sheet.
- Bake at 350 for 25 minutes for a smaller squash, and up to 45 minutes for a big one.
- You want to make sure to cook thoroughly, and no more! Over baked spaghetti squash gets mushy, so check it towards the end by pressing the skin, when it's done it will give a little under the pressure.
- Remove from the oven, flip it over, and let it cool a bit. I use a clean kitchen towel to hold the squash in one hand and a fork to remove all the spaghetti like strands.
- Top with your favorite marinara, puttanesca or pesto sauce, or try Lottie's recipe below, which you can make ahead.
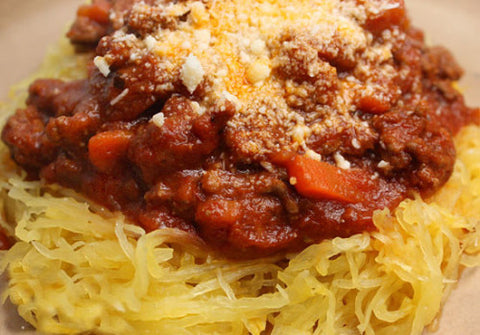
photo courtesy of runonveg.com
Slow Roasted Tomato Sauce
By Health Coach Lottie at RunOnVeg.com
Preheat oven 300/325 (depending on how hot your oven is)
-
2 cups cherry tomatoes
-
2 Rome tomatoes cut in half
-
2 medium size onions largely chopped (1 cup cooked)
-
6 garlic cloves
-
1/2 cup basil
-
1/2 cup water
-
1/4 cup Unsweetened Fire Cider or apple cider vinegar
-
salt to taste
Optional add in:
-
1/4 cup nutritional yeast
-
1-2 tablespoons hot sauce
-
2-3 dates
-
Line a baking sheet with parchment paper and non-stick spray. Place your tomatoes, onion and garlic on the baking sheet
-
Cook for 45-50 minutes until garlic is golden brown, remove the garlic from the tray
-
Cook the remaining ingredients (tomatoes and onion) for an additional 1 hour, for a total of 1 hour and 45-50 minutes
-
Once everything is cooled place all your ingredients in a blender including optional add ins and blend until smooth and creamy. Enjoy!
5 power foods to add to your winter menu + 1 recipe!
Winter is finally upon us in the Berkshires. Now is the time to take some preventative measures to insure a healthy winter. There are many ways to incorporate health building foods into a home cooked meal. Here are my top five, must eat foods for winter health and the best part is that combined, they make a delightful, one bowl meal.
- Bone broth + harmony
If you add one thing to your winter routine, start drinking a hot cup of bone broth. Why? Because it’s a collagen building, infection fighting, inflammation reducing wunder food. Just heat up and get cozy with your favorite mug and you are ready to go. We make our own, but you can also pick up bone broth at your local butcher shop. If you’d like to make your own, I recommend “How To Make Bone Broth” on WellnessMama.com, it’s full of resources. For the amount of broth we get, it’s definitely worth the effort!
- Mushrooms: we all love a fungi!
What goes great with bone broth and keeping your immune system strong and fortified against the winter chill? Mushrooms! Maitake and shiitake are two flavorful varieties that are readily available fresh or dried. Maitake, aka “Hen-of-the-Woods”, is my personal favorite. Add them dried to your broth for extra flavor and an immune boost. A plateful of fresh maitake mushrooms sauteed in butter with a little salt and black pepper is sublime. Add a perfectly fried over easy egg and it’s dinner.
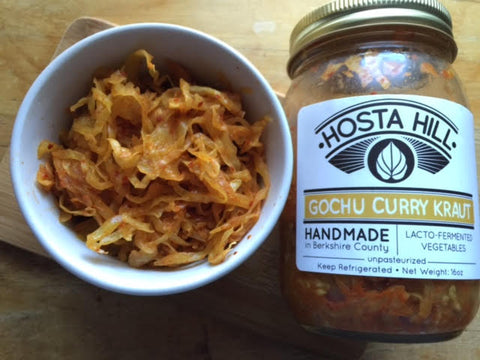
- Get fermented: foods that are good for your gut
Fermented foods introduce good bacteria and balance existing bacteria in your digestive system. Miso is a fermented superfood and it’s nutty umami depth adds the right amount of salty flavor to simple bone broth. Mix it in after the broth has been heated and plated. I’m a fan of Chickpea Miso by South River Miso. Other great for your gut and immune health fermented foods include yogurt, kombucha, Fire Cider and lacto-fermented veggies — Hosta Hill sauerkraut and kimchi are staples at our house.

- Stay warm with ginger
Ginger offers anti-inflammatory, antiviral, antifungal and antibacterial properties. A warming spice, you can add it to soups, cookies, breads, hot teas and broth. Grate fresh ginger into hot water with Fire Cider, lemon and honey is a soothing way to fight germs and mend a sore throat.

- Get your greens
It’s cold and dark outside so be sure to keep your mind and body bright with daily doses of green veggies. They are full of the vitamins and minerals you need to stay healthy and balanced, so make slow cooked collards or give saag paneer a try. Plate up a quick salad to go with your bowl of broth for a balanced meal of both raw, cooling food and warming, cooked food.
Best of all, you can combine these five super ingredients into one dish in about 15 minutes, with only 5 minutes of active time, for one satisfying meal. For someone who frequently skips lunch, I’ll consider this recipe my new year's resolution.

Mushroom Miso Broth - 2 servings
Ingredients:
- a small handful (about ⅓ cup) of dried maitake and/or shiitake mushrooms , chopped small, stems removed. Keep in mind they will expand 2-3 times during cooking.
- about 1 teaspoon or so of dried powdered ginger
- two cups or more bone broth, unsalted or lightly salted is best since the miso will add all the salt you will need!.
- shredded napa cabbage or kale, about a ½ cup or less should do.
- Miso to taste - use traditional soy miso or experiment with other flavors.
In a pot combine the dried mushrooms, powdered ginger and bone broth. Add a lid and bring to a boil.
Turn down the heat and simmer on low for 10-15 minutes or until the mushrooms are fully hydrated.
Turn off the heat and add a small handful or less shredded napa cabbage or kale.
When the greens are bright green, serve in two bowls.
Add your favorite miso to each bowl, I like about a tablespoon, or more. Serve with a side of kimchi and enjoy in good health!Zucchini Pancakes - Gluten Free and Low Carb
One thing we all have in abundance right now are zucchini's, either from your own garden or from your neighbors leaving bags full on your doorstep. Your welcome! A summer squash saute with onions, topped with fresh basil is my easy go to for abundant zucchini. Making pancakes with zucchini is a bit more interesting and they freeze really well so this is a nice way to make dinner, or breakfast, and save all the leftovers for later in the season.
In this recipe I use chick pea flour for best flavor and because it's gluten free, lower in carbohydrates and very nutritious. There is also a super low carbohydrate option: coconut flour. The measurements are different since coconut flour has a very high fiber content and will absorb much more liquid than the chickpea flour will. Either one is delicious.

On our way to dinner with friends, I reheated these under the broiler in a few minutes.
Ingredients:
8 Cups shredded zucchini
1 shy cup of finely chopped onion
2-3 cloves of garlic, pressed or finely chopped
zest of a small lime
1 Tablespoon of lemon juice
2 teaspoons dried oregano
Black pepper and salt, to taste
4 medium sized eggs, beaten
1 Cup of flour: chick pea works great, oat flour or spelt is nice too. For a super low carbohydrate option (Atkins, Candida Diet, etc) substitute with only a 1/2 cup of coconut flour.
Method:
Shred the zucchini, by hand if you want a work out or with the shredder attachment on your food processor.
Toss the shredded zucchini with salt and let it drain in a colander over a bowl for about 20 minutes. I know it's tempting to skip this step but it is crucial to ending up with yummy pancakes instead of globs of mush.

8 cups of shredded zucchini, salted, and set to drain into the bowl below.
Beat the eggs in a large bowl (large enough to accommodate all the ingredients), add in the onion, garlic, lime zest, lemon juice, oregano and black pepper.
Go back to your sweating zucchini after 20 minutes and give it a good squeeze. Really get in there and squeeze as much liquid out as you can. I got a full jam jar and then some and my zucchini was reduced in size by about half.

After 20 minutes and a lot of squeezing!
You can save the zucchini water for soup or you can be super hardcore and just drink it, it's good for you! I diluted mine with some ice water, it was a bit too salty, and added a shot of Fire Cider.
Once the zucchini has been squeezed and drained, mix it in with the eggs and seasonings.
The mixture will be soupy, which is where the flour comes in. Add the chickpea flour, 1/4 cup at a time till your zucchini mix is like thick muffin batter. Mine usually takes about one cup. You are now ready for frying!
I used my large cast iron skillet to cook these since I use my large cast iron skillet for everything. Add organic peanut, coconut or grapeseed oil to generously coat the pan and turn the heat to medium high. You can make these pancakes as small or as large as you want just be sure to get them nice and brown on each side- about 3 minutes each. Set them on a plate covered with paper to absorb the excess oil.
Serve immediately, topped with fresh goat cheese and more fresh oregano.
Or, let them cool completely on a cookie rack. Wrap them up and store them in the freezer. They make an excellent quick meal, just unwrap and pop them in your toaster oven or under the broiler.
The Greenest Wrap
One of my favorite ways to eat more greens is to use them in place of bread or crackers. Nothing against burger buns or sandwich bread but we know that whole grains are best, well, whole! Skip the processed wheat and grab a bunch of crispy Romaine or collard greens instead. I use Romaine lettuce like a taco shell- fill it up with whatever you like- sliced avocado, tomato, homemade mayo and bacon for a healthier B.L.T. Bibb lettuce is soft, flexible and makes for a great little wrap. Want to eat that salad with your hands? Wrap it up in the biggest lettuce leaves from the outside of the bunch. Look at you, doubling down on your veggies!

Using large collard leaves makes for a sturdier wrap that can hold such awesome summer foods as cheese burgers or the ultimate hummus wrap. You can use the leaves raw or lightly steamed -- these are best for hot foods or for bigger wraps. The folding is easy and unlike regular wraps, these stay sealed. The only prep work you need to do is to carefully trim them rough stems.
Cut the end of the stem off and then lay the collard leaf flat and slice off the rough stem that sticks up, so that the leaf is flat and entirely flexible, like in this photo from MindBodyGreen.com's tutorial on how to use collards like a wrap!

Don't worry if you tear the collard leaf a bit, you'll get the hang of the stem trimming and can fold around any small tear.
If you want to steam your collard leaves so that they are more flexible and easier to use and eat, there are a few methods that work well. This video from Plant Powered Kitchen.com has my favorite technique for when you just want to make up a few wraps. Get some water boiling in your kettle and open the spout so you've got a nice stream of steam coming up. Hold your raw collard leaf by the stem and wave it over the spout of steam, lightly steaming the whole leaf until it's bight green and soft enough to fold. Then trim off the stem as described above. Repeat until you have enough wraps.
Or, follow the quick blanch method I found on Mind Body Green.com- bring a wide shallow pan of water to a simmer. Take your de-stemmed collard leaves and give them a 10 second dunk in the pan, one at a time, using tongs to get the collard leaves in and then out and into an ice bath. Dry in layers using tea towels. Once you've got all your wraps ready, fill as desired!
The wrapping part is easy, and there are a number of ways to do it, but this photo tutorial from Honest Fare.com is easy to follow:

Add your filling to the center of one or two overlapping leaves. Fold the sides in to contain the filling. Then, starting at one long end, roll the leaf over the filling and keep rolling, making sure the ends stay tucked in. Slice in half and enjoy!

Above: steamed collard wrapped burger with the works from Bareburger.
Quinoa Pizza Crust
Our friend Lottie came up with this gluten free quinoa based pizza crust. The recipe is from her blog, Running On Veggies, where she shares her love of healthy eating through recipes and health coaching, check her out!
"I’ve never been much of pizza eater, but I do love a crispy crunchy texture you get from the crust of a pizza. In the past, I always would take a brown rice wrap and toast it until it was crispy. This pizza crust reminds me exactly of that! But this is so much better and so easy to make! Lately I found that I don’t make or even attempt most recipes because it always seems complicated and has way too many ingredients (Still upset about all those times I attempted cauliflower crust pizza, but failed!). So I pride myself for my recipes with minimal ingredients and easy directions.

For this crust, all you really need is quinoa and water! Everything else in here just gives it more flavor. Just remember to leave yourself enough time to soak your quinoa for at least 6 hours. I soaked mine the night before, but you can totally do it before heading out for the day. And for an additional reason to try this recipe, it takes under 30 minutes to put together!
I used Unsweetened Fire Cider that added extra flavor to the pizza crust! I am so excited to play around with this product; the smell alone is incredible. The original is sweetened with honey, so naturally I was excited to see them come out with an unsweetened version. It’s really mild in taste, not like traditional apple cider vinager because it’s mixed with other flavors such as: Oranges,Lemons,Onions,Horseradish,Ginger,Habanero Pepper,Garlic and Turmeric. Along with a ton of health benefits, it tastes great on its own. To my surprise traditional pizza dough has a ton of sugar, so instead I used Fire Cider and it gave it that sweet flavor found in pizza dough!
Take a look at whats in regular store bought pizza-
Traditional Pizza Crust Ingredients:Enriched bleached wheat flour (bleached flour, malted barley flour, niacin, ferrous sulfate, thiamin mononitrate, riboflavin, folic acid), water, yeast, salt, sugar, soybean &/or cottonseed oil, whey, may contain 2% or less of enzymes &/or datem, vital wheat gluten, potassium sorbate (preservative), ascorbic acid, sodium stearoyl lactylate.
HA what are half of those ingredients?! Try this instead:
Recipe: Preheat 425 degrees
- 1 cup of quinoa uncooked (soaked for at least 6 hours or overnight)
- 1/4 cup water
- 1/2 teaspoon baking powder
- 3 tablespoons of Unsweetened Fire Cider
- 1/2 teaspoon salt
- 1 teaspoon nutritional yeast(optional for extra “cheesy” flavor”)
- 2 cloves roasted garlic (optional)
Directions:
- Rinse your soaked quinoa with a strainer really well.

- Place all your ingredients in a blender, blend for a couple minutes till really smooth and creamy. It should look like this:

- Place parchment paper on a 10-12 inch pizza pan or baking dish, Spray with non-stick spray, and spread out batter on to the dish.

- Cook for 15 minutes, then flip and cook an additional 10-12 minutes till crispy and brown.

- Place your favorite toppings on top get creative! Place back in the oven for an additional 3-5 minutes or until desired.


Butter Braised Collards with Fire Cider
A guest blog post by Alana from Eating From The Ground Up a Berkshire based blog about food, family, and the wonderful chaos that ensues when the two combine. Check her out after you try Alana's Butter Braised Collard recipe!
"We’ll start with the butter. In general if you hand me a vegetable, I’m going to steam it. I’m a big believer in the steamer pot (that’s a shorter pot with holes that fits into a larger pot) as opposed to those funny collapsable things that are THE MOST FUN thing in the kitchen drawer for toddlers to play with, but even in a pinch I’ll lazy steam with an inch of water and a covered pot. This is the vegetable cooking method I was raised on, and, picky kid that I was, I probably wouldn’t have grown about 5 feet without my daily dose of steamed broccoli. I’ll steam anything except cauliflower, as cauliflower was put on this earth to be roasted.
And yes, that brings us to roasting, the hip method of the moment way to cook all vegetables. Like most hip food trends ( kimchi, good chocolate, cronuts), it got that way from being delicious, and I fully support roasting.

But then there’s braising, which, in the case of vegetables, involves a bit more water and time than lazy steaming. This all started when Alice Waters (or the army of Californians who make up Alice Waters) told me to braise cabbage in water with a big nob of butter. I think it’s called buttered cabbage in her book, and I’d choose it over most foods. Even if you’re not a cabbage lover, buttered cabbage will turn you.
This method–the hearty green, the inch or two of water, the big knob of butter–it lubricates the very fiber of the green so that it becomes plump and buttery through and through. I’ve come to do this with cabbage whenever I have the chance, but also with broccoli raab and most recently, collards. Lately I’ve been loving the final addition of Fire Cider, a magical spicy concoction which I usually just drink straight (a shot every day, plus extra if I’m not feeling my best), but is so so good with butter and collards. This Fire Cider is made by my friends who, since the last time we spoke of them, have gained full organic certification and have continued to stretch their reach farther across the country, spreading wellness and deliciousness as they go. I feel very proud to have them here in this little county, and especially there in my sidebar.
If you don’t have any Fire Cider, let’s try to remedy that, you can find store locations here. But if you want to make these greens right now, a fitting substitute in this recipe would be some apple cider vinegar just there at the end, maybe with a little extra garlic and something spicy.

Butter Braised Collards with Fire Cider
2 tablespoons butter
1 large bunch collard greens
3/4 cup water
2 garlic cloves, peeled and finely chopped
Olive oil
Salt
2 to 3 tablespoons Fire Cider
1. First, prepare the collards: Cut the stem out of each leaf, and roughly chop the stems. Then cut the collard leaves into thin ribbons.
2. Melt the butter in a large skillet or saucepan over medium heat. Add the chopped stems and 1/2 cup of the water and bring to a low boil. Cover the pan, reduce the heat to medium low, and cook until the stems are tender, about 10 minutes.
3. Add the collard leaves to the pot along with the remaining 1/4 cup water. Cover, and cook, stirring occasionally, for an additional 10 minutes. Remove the lid, raise the heat to medium high, and add the garlic, stirring to combine and toss the greens in the buttery liquid for about 30 seconds. Remove the pan from heat. Drizzle with olive oil, sprinkle with salt, and toss with 2 tablespoons of Fire Cider. Taste, and add an additional tablespoon of Fire Cider if you like."
View the original post HERE!
Sprouts and Beans!
My idea of a balanced meal is a plate full of green veggies with a side of slow cooked beans with a Red Apple Butchers hot Italian sausage. A filling and delicious winter meal and yep, it's healthy too. Of course, if you are going to eat meat, make sure it's from an animal raised on a healthy farm, certified humane and organic. Or buy direct from a local farm or a butcher shop that only sells humanely raised farm animals like James and Jazu at Red Apple Butchers in Berkshire Organics.
This recipe takes about 35 minutes, most of which is cooking time. Getting the beans in the oven only takes about 5 minutes. Then you can make the Brussels sprouts while the beans cook. These recipes easily double so you'll have healthy leftovers, cook once and get meals for days!

Sauteed Brussels sprouts, beans and sausage!
For the Beans you will need:
1 large onion, diced
2 (16-ounce) cans of organic beans - Amy’s Organic brand should be easy to find if you are in a hurry! Or soak and cook your own dried beans.
3 tablespoons of your favorite spicy mustard
2 Tablesppons honey or maple syrup (optional)
4 tablespoons ketchup, we love First Field Ketchup from New Jersey
1 tablespoon Fire Cider or Apple Cider Vinegar
about 1/3 cup lard, olive oil or, my favorite, rendered bacon fat!
To Make:
Preheat oven to 350 degrees F.
In a Dutch oven mix onion, beans, mustard, maple syrup or honey if using, ketchup, and Fire Cider. Then mix in the fat, I highly recommend rendered bacon fat.
Bake, covered, for 30 minutes.
For the Brussels Sprouts:
In a cast iron pan, cover the bottom with prepared, halved Brussels sprouts. Add a small amount of water, turn the heat up and cover. Steam the sprouts until just tender. Pour off any excess water; add a knob of fresh pasture butter and sauté until golden brown. Deglaze with a splash or two of Fire Cider, add salt to taste.
Add a cooked, sliced sausage from Red Apple Butchers or some Hosta Hill Tempeh to your beans for a balanced, healthy meal.
Fall Favorite: Cauliflower 3 Ways
 From LowCarbSlowCarb.com[/caption] My first recipe suggestion is to make rice out of cauliflower, a low carbohydrate, high fiber, nutrient packed alternative to a grain side dish. I've eaten this rice as a side with baked chicken, in lettuce wraps with shredded pork, basically it can be substituted anywhere you'd usually use rice. How cool is that? Check out this super simple recipe on www.lowcarbslowcarb.com under, you guessed it, Cauliflower Rice! [caption id="attachment_738" align="aligncenter" width="538"]
 Cauliflower Steak au Poivre by Jacky Hackett[/caption] Next up, Cauliflower Steaks. This recipe was sent to me by a friend who I have shared many a steak tartare and pork chop with so I knew it had to be delicious. I was a bit skeptical but he assured me this was no wimpy vegan alternative, it's filling, awesome plant food thank you very much! The recipe I like best comes from www.jaxhouse.com, aka Jacky Hackett, a food enthusiast mom blogger. You can find her simple and easy recipe under 'Cauliflower Steak au Poivre. The trick is using your cast iron skillet in a very hot oven and the results are wickedly good. [caption id="attachment_739" align="aligncenter" width="538"]
 Photo from TheIronYou.com[/caption] This last recipe is sure to convert you to the power of what you used to think of as a bland white vegetable: The Cauliflower Grilled Cheese. Yes, it's gluten free, it's a full serving of veggies and it's got a gooey cheese center. This recipe can be found on www.TheIronYou.com a blog run by a guy named Mike who thinks we could all eat better and exercise more for a more awesome us, I think he's onto something! Search for 'Cauliflower Grilled Cheese' and you'll find a recipe for what will become one of your fall favorites, no matter what your relationship is to gluten. Pair this with a hot bowl of tomato soup and call it lunch. Be sure to check out the other recipes and ideas these bloggers have to offer!

